Thursday 6 June 2013

DIY Makeup Brush Holder

I've been slowly building a collection of (inexpensive) makeup brushes. As my makeup obsession grows, so does my brush collection. I've been storing my brushes in a brush roll that came with a set of brushes from Walmart. Although brush rolls are great for travelling, they don't provide the quick access to brushes that is sometimes required in the mornings. (Want to look good, don't want to miss the bus to campus)

For a long time I've wanted to buy a makeup brush holder from Glitzy-Glam, but can't justify spending $18 plus shipping just for a (cute) glass jar that will hold my brushes. Recently I came across missglamorazzi's tutorial on YouTube for a do-it-yourself makeup brush holder, and I realized that a makeup brush holder could be within my budget! Here's what I did.

The Tutorial:

All I needed for the brush holder was:
1. An old Bath and Body Works 3-wick candle jar - my love of BBW candles came in handy!
2. Vase filler, which I bought for $2 from dollarama
3. A paint brush, which I already had from previous crafty projects
4. Glitter, which I bought for $1 from dollarama
5. Mod Podge - I bought the smallest, cheapest jar I could find at Walmart. I think it was 3-4 dollars.


The first thing I needed to do was clean up the candle jar. When I started it had a label, a burn mark, the ends of 3 wicks, and a bit of wax left in the bottom. Like this:


Here is how to clean up your candle jar:

Start by putting your candle in the freezer for a couple of hours. When you take the candle out of the freezer, take a butter knife and gently loosen the wax from the glass around the edges. Then stick the knife into the center (ish) of the wax and twist until the wax cracks. This part was a lot harder for me than missglamorazzi made it look. The wax did not want to crack! After a lot of playing around with the knife, I finally got it to crack and the pieces came out smoothly.


Now it's time to remove the wicks. Pour some hot water into the jar and swirl it around to melt the glue. You should then be able to easily remove the wicks. Next peel off the labels - the bottom one comes off easily with the knife, and the side one comes off easily just using your fingers. Then clean the jar to remove any extra glue or residue stuck on the glass. You can use nail polish remover to help with stubborn residue. Any burn marks on the glass should wash off easily. When you're done, it should look like this:


Tah dah! Now it's time for the fun part... glitter!

Take your mod podge and paint brush and paint a thin, even layer of mod podge all over the inside of the glass jar. The more even the mod podge, the more even the glitter will be.


Then pour a lot of glitter into the jar. Tilt the jar around so that the glitter coats the entire surface. You'll want some scrap paper or newspaper underneath to catch any glitter that falls out.


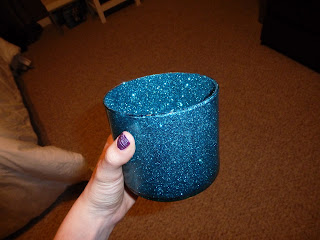
As you can see, the glitter did not turn out perfectly even on the first try, but that's okay! I shook off as much excess glitter as I could and left the jar upside down over night to dry. In the morning I applied another coat of mod podge over top of the dry glitter. This had to be done carefully so that I wasn't pulling any glitter off. I then applied another layer of glitter and left it to dry. After the second coat it was all even!


Once the glitter has dried, it's time to finish up the makeup brush holder. Dump the vase filler into the jar and then you can stand your brushes in the vase filler.


My brush holder happened to fit perfectly beside my makeup organizer on my desk!


And that's it! A super inexpensive way to display your makeup brushes. I hope you enjoyed this tutorial! 

-Mariah

Friday 24 May 2013

Swan French Tip - Nail Art Tutorial

I got my last wisdom tooth out yesterday. Two years ago I got the other two wisdom teeth out, but this last one was still far from ready so they didn't take it out until yesterday. Since I'm in recovery I have to take it easy, which can get boring pretty quickly. I figured it was a perfect opportunity to paint nails! I did my mom's finger nails and toe nails and then I did my own fingernails. I did a really simple design on my nails that turned out looking pretty fancy. Since it was so easy I figured it would make a good tutorial! I call it swan french tip.


The Tutorial:

To achieve this design all you need is a regular white nail polish, and a blue striper nail polish. The striper I used is from Walmart and was really inexpensive and works great!


Start by painting a strip of the white polish along the tip of your nail. It will probably take two coats to make it smooth and opaque. If you get some polish on your finger, you can use a q-tip with nail polish remover to fix the mistake.


After letting the white dry for a few minutes, you can start on the blue "swan". First draw a line of blue along the edge of the white polish. Let the line come to a point about 3/4 of the way across your nail. This can be achieved by slowly pulling the brush tip away from the nail as you draw the line. Once the first line is drawn, you will draw the top line. Start at the same corner as the first line, and draw at a 45 degree angle so that the line is being drawn towards the centre of your nail. Before reaching the centre, create a hook by looping up and back towards the corner where the line started. To finish off the design, draw a line between the first two, again bringing the line to a point about 3/4 of the way across.


Repeat this on each nail and add a top coat if you wish. For a topcoat, remember to use a thick coat so that the brush does not pull on the design and ruin it. The brush should not actually touch the nail as you apply the top coat.


And that's it! Hope you enjoyed this design and tutorial!

-Mariah

Saturday 18 May 2013

Magnetic Polish Review

I've been wanting to try magnetic nail polish ever since it came out. It's a bit pricier than regular polish, and I've been afraid to splurge on it because I wasn't sure it would work. I've seen a lot of negative reviews on YouTube that have kept me from trying it out. There have been a couple of times where I've seen the Sally Hansen magnetic polish display at Walmart and have picked one out to try.... but then convinced myself that it will probably be a waste of money and put it back.

Today while browsing through the makeup section at Dollarama (which I highly suggest doing - you will be surprised what they're selling there for dirt cheap!) I noticed that they were selling 3 different colours of Sally Hansen's magnetic nail polish for $2. I figured there wasn't really anything to lose if I didn't like it and it only cost me two dollars, so I picked up a black one (the other options were silver or gold). The colour is called "graphite gravity" and is actually more of a dark silver. 


I am not sure where all of the negative reviews are coming from, because I absolutely love this polish! I just tried it out and it was super easy and looks great! I applied it exactly as the instructions on the back said. Here's what I did:

First I applied a base layer of the polish and let it dry


Then I put a second coat on one nail and immediately took the magnet and held it over top of the nail for 10-15 seconds. I made sure I placed the guide piece just above the cuticle so the magnet was over the whole nail. 


When I pulled the magnet away, the wave design was there! Then I repeated this for each nail. When I was done, my nails looked like this:


I'm in love with the results. It looks smooth and shiny! I'm gonna have to make a trip to Walmart soon to buy some brighter colours of magnetic polish. If you're unsure about magnetic polish, I highly recommend buying it from Dollarama first to see if you like it. Hope this review was helpful!


-Mariah

Wednesday 15 May 2013

Floss Your Nails! - Nail Art Tutorial

For my first nail tutorial, I thought I'd show a new technique that I tried today. I learned it from cutepolish on YouTube. I get a lot of my nail art designs and inspiration from cutepolish, she has great tutorials! I really like how today's design turned out, though I don't think pictures do it justice.


Today I did a multi-coloured stripe design. You don't need thin brushes to create the stripes. The stripes are done with floss! More specifically, floss picks. Like this:


It makes creating stripes really easy and gives a really cool effect.


The Tutorial:

First, pick 3-4 colours for your stripes. I picked dark purple, light purple, silver, and black. Start by painting your nails one of the colours. I did dark purple with a silver accent nail. By the time the design was finished, the accent nail wasn't very noticeable anymore so it was kind of pointless. If you want to have an accent nail that really stands out, I suggest using different colours for it's stripes than the rest of your nails.


It took two coats on each nail to make them opaque. This base coat doesn't have to be perfect, we'll clean up any polish on the skin at the end.

Now we're gonna add stripes! Starting with a colour different than your base coat, paint the floss with a thin layer of the polish.


Then place the floss on one side of your nail and roll it horizontally across the nail. I did my best to capture this, but the camera decided to focus on my thumb instead of my index finger.


It doesn't have to look perfect, that's the great thing about this design. Create a bunch of stripes on each nail with this first colour, adding more polish to the floss as needed. Then use your next colour to create more stripes. Don't be afraid to overlap colours, it just adds to the effect. After using all of your colours, make a few stripes in your base coat colour to finish off the design. You can add a top coat if you like, but I skipped the top coat (personal preference). Now you'll have something like this:


It's a little messy, so take a q-tip dipped into nail polish remover and carefully clean off the nail polish that got on your skin. Once it's all cleaned up, it will look like this:


And you're done! Hope you enjoyed this tutorial!


-Mariah


Saturday 11 May 2013

Introduction!

I am a recent university graduate. I completed my Bachelor of Science with a double major in Applied Mathematics and Computer Science. It was a roller coaster ride getting here (trust me when I say math is no easy major). During my time at university, I picked up some hobbies/talents that I taught myself. Things like nail art, makeup, sewing, and cooking. My nail art is what sparked the idea for this blog. I've been posting pictures of my nail art on my Facebook ever since my first year of university. I've received so many comments and compliments, and I thought it would be fun to share my nail art more publicly.

A little bit about me. I am a member of the Church of Jesus Christ of Latter-day Saints. My faith has defined who I am today, and is the most positive influence in my life. I have the best family! I come from a family of five - Mom, Dad, two brothers (one older, one younger), and me. Growing up with two brothers and no sisters has given me some not-so-girly interests like cars and video games. I also love sports, art (drawing and painting), crafts/diy projects, and music. Music is a huge part of my life. My entire family can sing - my Mom and her brother and sisters have a Christmas album. I love to sing, but most of all I love to sing harmony. I was in choirs all through school and spent a lot of time singing with my high school best friends Heather, Devon, and Alisa. I have a YouTube channel where I've posted some performances from high school and where Devon and I continue to post covers (with occasional guest appearances from Heather). You can check out our videos here! I play drums, acoustic guitar, and trumpet. I like to tinker around on the piano as well. I am a reader. I'm a sucker for a good girly book! I have a bit of an obsession with makeup and fashion, which stems from watching beauty gurus on YouTube. I am a huge math nerd and computer nerd, hence the double major. I hope to soon have a job in computer programming! So...that's me in a nutshell.


My plan for this blog is to post about nail art, makeup, diy projects, and music, all of which are things that my post-secondary education could not teach me. If any of these things are for you, subscribe and stay tuned for more posts! (And don't forget to check out my YouTube channel!)


-Mariah